文章来自:
http://blog.csdn.net/blue6626/article/details/6641105
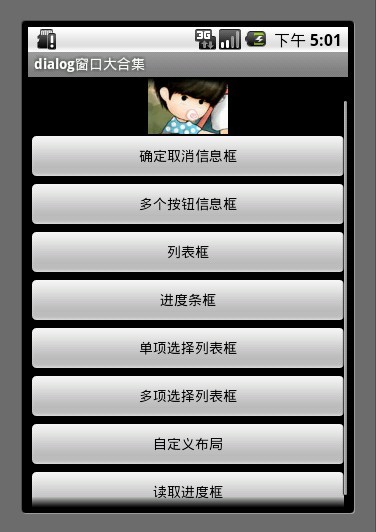
今天我用自己写的一个Demo 和大家详细介绍一个Android中的对话框的使用技巧。
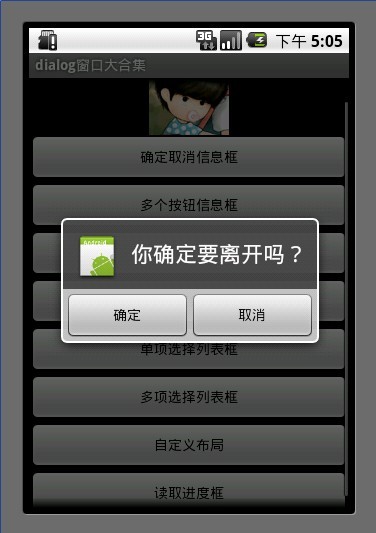
1.确定取消对话框对话框中有2个按钮 通过调用 setPositiveButton 方法 和 setNegativeButton 方法 可以设置按钮的显示内容以及按钮的监听事件。
我们使用AlerDialog 创建对话框
- AlertDialog.Builder builder = new AlertDialog.Builder(MainDialog.this);
使用builder设置对话框的title button icon 等等
- builder.setIcon(R.drawable.icon);
- builder.setTitle("你确定要离开吗?");
- builder.setPositiveButton("确定", new DialogInterface.OnClickListener() {
- public void onClick(DialogInterface dialog, int whichButton) {
-
- showDialog("你选择了确定");
- }
- });
- builder.setNegativeButton("取消", new DialogInterface.OnClickListener() {
- public void onClick(DialogInterface dialog, int whichButton) {
-
- showDialog("你选择了取消");
- }
- });
- builder.create().show();
这个dialog用于现实onClick后监听的内容信息
- private void showDialog(String str) {
- w AlertDialog.Builder(MainDialog.this)
- .setMessage(str)
- .show();
- }
2.多个按钮信息框
- AlertDialog.Builder builder = new AlertDialog.Builder(MainDialog.this);
- builder.setIcon(R.drawable.icon);
- builder.setTitle("投票");
- builder.setMessage("您认为什么样的内容能吸引您?");
- builder.setPositiveButton("有趣味的", new DialogInterface.OnClickListener() {
- public void onClick(DialogInterface dialog, int whichButton) {
- showDialog("你选择了有趣味的");
- }
- });
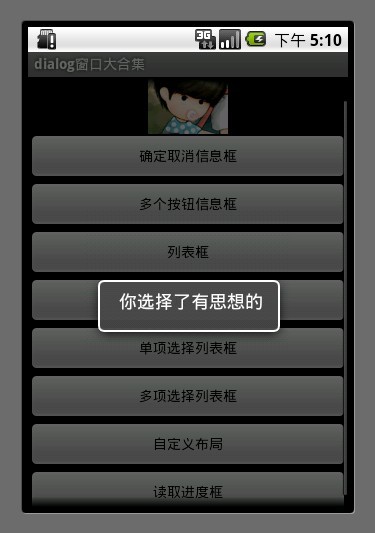
- builder.setNeutralButton("有思想的", new DialogInterface.OnClickListener() {
- public void onClick(DialogInterface dialog, int whichButton) {
- showDialog("你选择了有思想的");
- }
- });
- builder.setNegativeButton("主题强的", new DialogInterface.OnClickListener() {
- public void onClick(DialogInterface dialog, int whichButton) {
- showDialog("你选择了主题强的");
- }
- });
- builder.create().show();
3.列表框
这个数组用于列表选择
- final String[] mItems = {"item0","item1","itme2","item3","itme4","item5","item6"};
- AlertDialog.Builder builder = new AlertDialog.Builder(MainDialog.this);
- builder.setTitle("列表选择框");
- builder.setItems(mItems, new DialogInterface.OnClickListener() {
- public void onClick(DialogInterface dialog, int which) {
-
- showDialog("你选择的id为" + which + " , " + mItems[which]);
- }
- });
- builder.create().show();
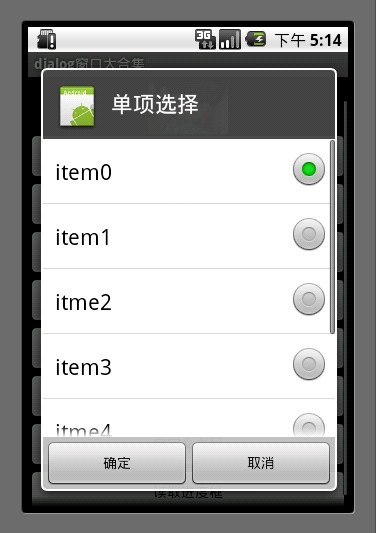
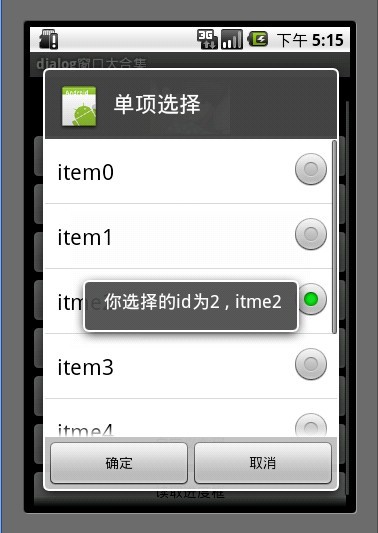
4.单项选择列表框
mSingleChoice 用于记录单选中的ID
- int mSingleChoiceID = -1;
- AlertDialog.Builder builder = new AlertDialog.Builder(MainDialog.this);
-
- mSingleChoiceID = -1;
- builder.setIcon(R.drawable.icon);
- builder.setTitle("单项选择");
- builder.setSingleChoiceItems(mItems, 0, new DialogInterface.OnClickListener() {
- public void onClick(DialogInterface dialog, int whichButton) {
- mSingleChoiceID = whichButton;
- showDialog("你选择的id为" + whichButton + " , " + mItems[whichButton]);
- }
- });
- builder.setPositiveButton("确定", new DialogInterface.OnClickListener() {
- public void onClick(DialogInterface dialog, int whichButton) {
- if(mSingleChoiceID > 0) {
- showDialog("你选择的是" + mSingleChoiceID);
- }
- }
- });
- builder.setNegativeButton("取消", new DialogInterface.OnClickListener() {
- public void onClick(DialogInterface dialog, int whichButton) {
-
- }
- });
- builder.create().show();
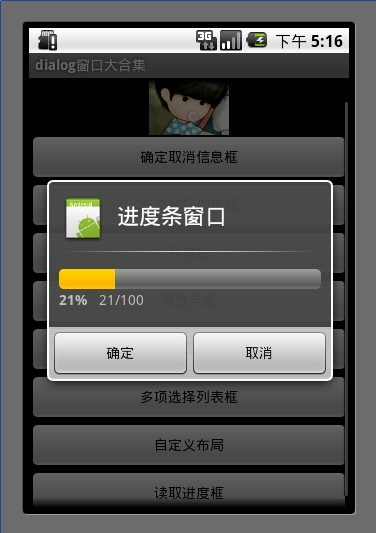
5.进度条框
点击进度条框按钮后 开启一个线程计算读取的进度 假设读取结束为 100
Progress在小于100的时候一直在线程中做循环++ 只到读取结束后,停止线程。
- mProgressDialog = new ProgressDialog(MainDialog.this);
- mProgressDialog.setIcon(R.drawable.icon);
- mProgressDialog.setTitle("进度条窗口");
- mProgressDialog.setProgressStyle(ProgressDialog.STYLE_HORIZONTAL);
- mProgressDialog.setMax(MAX_PROGRESS);
- mProgressDialog.setButton("确定", new DialogInterface.OnClickListener() {
- public void onClick(DialogInterface dialog, int whichButton) {
-
- }
- });
- mProgressDialog.setButton2("取消", new DialogInterface.OnClickListener() {
- public void onClick(DialogInterface dialog, int whichButton) {
-
- }
- });
- mProgressDialog.show();
- new Thread(this).start();
-
- ic void run() {
- int Progress = 0;
- while(Progress < MAX_PROGRESS) {
- try {
- Thread.sleep(100);
- Progress++;
- mProgressDialog.incrementProgressBy(1);
- } catch (InterruptedException e) {
-
- e.printStackTrace();
- }
-
- }
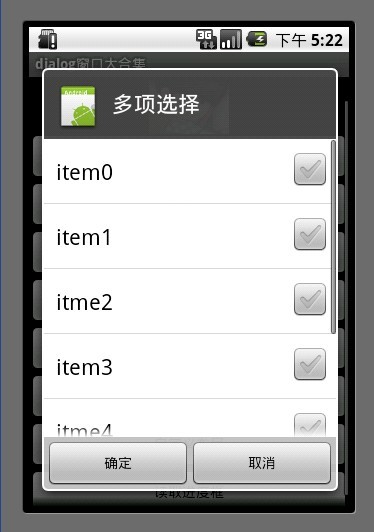
6.多项选择列表框
MultiChoiceID 用于记录多选选中的id号 存在ArrayList中
选中后 add 进ArrayList
取消选中后 remove 出ArrayList。
- ArrayList <Integer>MultiChoiceID = new ArrayList <Integer>();
- AlertDialog.Builder builder = new AlertDialog.Builder(MainDialog.this);
-
- MultiChoiceID.clear();
- builder.setIcon(R.drawable.icon);
- builder.setTitle("多项选择");
- builder.setMultiChoiceItems(mItems,
- new boolean[]{false, false, false, false, false, false, false},
- new DialogInterface.OnMultiChoiceClickListener() {
- public void onClick(DialogInterface dialog, int whichButton,
- boolean isChecked) {
- if(isChecked) {
- MultiChoiceID.add(whichButton);
- showDialog("你选择的id为" + whichButton + " , " + mItems[whichButton]);
- }else {
- MultiChoiceID.remove(whichButton);
- }
-
- }
- });
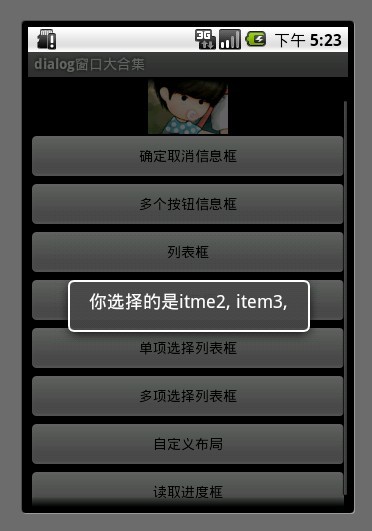
- builder.setPositiveButton("确定", new DialogInterface.OnClickListener() {
- public void onClick(DialogInterface dialog, int whichButton) {
- String str = "";
- int size = MultiChoiceID.size();
- for (int i = 0 ;i < size; i++) {
- str+= mItems[MultiChoiceID.get(i)] + ", ";
- }
- showDialog("你选择的是" + str);
- }
- });
- builder.setNegativeButton("取消", new DialogInterface.OnClickListener() {
- public void onClick(DialogInterface dialog, int whichButton) {
-
- }
- });
- builder.create().show();
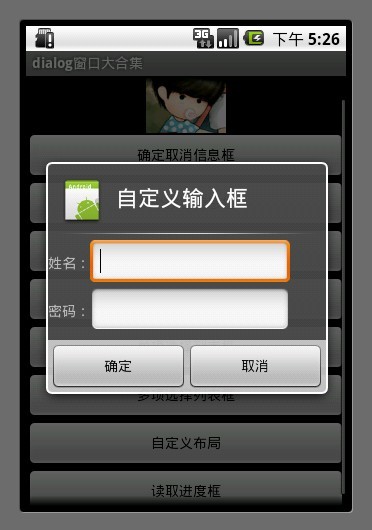
7.自定义布局
讲到自定义布局我就得多说一说了,为什么要多说一说呢?
其实自定义布局在Android的开发中非常重要 因为它能让开发者做出自己五彩缤纷的Activity 而不用去使用系统枯燥的界面。
自定义dialog有什么好处?
比如我们在开发过长当中 要通过介绍系统发送的一个广播弹出一个dialog . 但是dialog必需是基于activity才能呈现出来 如果没有activity 的话 程序就会崩溃。所以我们可以写一个自定义的 dialog 把它定义成一个activity
这样我们收到一条打开dialog的广播后 直接启动这个 activity 程序正常运行~~
这就是自定义dialog的好处。
注明:下面这个例子只是写了自定义dialog 没有把它单独的写在一个activity中 如果须要的话 可以自己改一下。
- AlertDialog.Builder builder = new AlertDialog.Builder(MainDialog.this);
- LayoutInflater factory = LayoutInflater.from(this);
- final View textEntryView = factory.inflate(R.layout.test, null);
- builder.setIcon(R.drawable.icon);
- builder.setTitle("自定义输入框");
- builder.setView(textEntryView);
- builder.setPositiveButton("确定", new DialogInterface.OnClickListener() {
- public void onClick(DialogInterface dialog, int whichButton) {
-
- EditText userName = (EditText) textEntryView.findViewById(R.id.etUserName);
- EditText password = (EditText) textEntryView.findViewById(R.id.etPassWord);
- showDialog("姓名 :" + userName.getText().toString() + "密码:" + password.getText().toString() );
- }
- });
- builder.setNegativeButton("取消", new DialogInterface.OnClickListener() {
- public void onClick(DialogInterface dialog, int whichButton) {
-
- }
- });
- builder.create().show();
- <span style="color:#000000;"><?xml version="1.0" encoding="utf-8"?>
- <RelativeLayout xmlns:android="http://schemas.android.com/apk/res/android"
- android:layout_height="wrap_content"
- android:layout_width="wrap_content"
- android:orientation="horizontal"
- android:id="@+id/dialog">
- <LinearLayout
- android:layout_height="wrap_content"
- android:layout_width="wrap_content"
- android:orientation="horizontal"
- android:id="@+id/dialogname">
-
- <TextView android:layout_height="wrap_content"
- android:layout_width="wrap_content"
- android:id="@+id/tvUserName"
- android:text="姓名:" />
- <EditText android:layout_height="wrap_content"
- android:layout_width="wrap_content"
- android:id="@+id/etUserName"
- android:minWidth="200dip"/>
- </LinearLayout>
- <LinearLayout
- android:layout_height="wrap_content"
- android:layout_width="wrap_content"
- android:orientation="horizontal"
- android:id="@+id/dialognum"
- android:layout_below="@+id/dialogname"
- >
- <TextView android:layout_height="wrap_content"
- android:layout_width="wrap_content"
- android:id="@+id/tvPassWord"
- android:text="密码:" />
- <EditText android:layout_height="wrap_content"
- android:layout_width="wrap_content"
- android:id="@+id/etPassWord"
- android:minWidth="200dip"/>
- </LinearLayout>
- </RelativeLayout></span>
8.读取进度框
显示一个正在转圈的进度条loading
- mProgressDialog = new ProgressDialog(this);
- mProgressDialog.setTitle("读取ing");
- mProgressDialog.setMessage("正在读取中请稍候");
- mProgressDialog.setIndeterminate(true);
- mProgressDialog.setCancelable(true);
- mProgressDialog.show();
源码下载地址:http://www.kuaipan.cn/index.php?ac=file&oid=3166172581218727
分享到:


相关推荐
主要介绍了Android AlertDialog对话框用法,结合实例形式分析了AlertDialog对话框的功能及常见使用技巧,需要的朋友可以参考下
主要介绍了Android实现点击AlertDialog上按钮时不关闭对话框的方法,涉及设置监听的相关技巧,具有一定参考借鉴价值,需要的朋友可以参考下
主要介绍了Android编程实现AlertDialog自定义弹出对话框的方法,结合实例形式分析了Android AlertDialog自定义弹出对话框的基本功能与事件监听实现技巧,需要的朋友可以参考下
主要介绍了Android编程之自定义AlertDialog(退出提示框)用法,结合实例形式较为详细的分析了自定义AlertDialog的页面布局与功能实现相关技巧,需要的朋友可以参考下
3.12 具有交互功能的对话框——AlertDialog窗口 3.13 置换文字颜色的机关——Button与TextView的交互 3.14 控制不同的文字字体——Typeface对象使用 3.15 如iPhone拖动相片特效——Gallery画廊 3.16 自制计算器——...
3.12 具有交互功能的对话框——AlertDialog窗口 3.13 置换文字颜色的机关——Button与TextView的交互 3.14 控制不同的文字字体——Typeface对象使用 3.15 如iPhone拖动相片特效——Gallery画廊 3.16 自制计算器——...
3.12 具有交互功能的对话框——AlertDialog窗口 3.13 置换文字颜色的机关——Button与TextView的交互 3.14 控制不同的文字字体——Typeface对象使用 3.15 如iPhone拖动相片特效——Gallery画廊 3.16 自制计算器——...
0、ANDROID常用类库说明 6 1、ANDROID文件系统与应用程序架构 7 1.1、ANDROID 文件系统 7 1.2、ANDROID应用程序架构 9 2、ANDROID应用程序结构 11 2.1、ACTIVITY 12 2.1.1、概述 12 2.1.2、Activity的生命周期 15 ...
主要介绍了Android中AlertDialog显示简单和复杂列表的方法,结合实例形式分析了Android的AlertDialog创建列表显示对话框的相关方法与常见操作技巧,需要的朋友可以参考下
3.12 具有交互功能的对话框——AlertDialog窗口 3.13 置换文字颜色的机关——Button与TextView的交互-p60 3.14 控制不同的文字字体——Typeface对象使用 3.15 如iPhone拖动相片特效——Gallery画廊 3.16 自制计算器...
3.12 具有交互功能的对话框——AlertDialog窗口 3.13 置换文字颜色的机关——Button与TextView的交互 3.14 控制不同的文字字体——Typeface对象使用 3.15 如iPhone拖动相片特效——Gallery画廊 3.16 自制计算器...
3.12 具有交互功能的对话框——AlertDialog窗口 3.13 置换文字颜色的机关——Button与TextView的交互-p60 3.14 控制不同的文字字体——Typeface对象使用 3.15 如iPhone拖动相片特效——Gallery画廊 3.16 自制计算器...
3.12 具有交互功能的对话框——AlertDialog窗口 3.13 置换文字颜色的机关——Button与TextView的交互-p60 3.14 控制不同的文字字体——Typeface对象使用 3.15 如iPhone拖动相片特效——Gallery画廊 3.16 自制计算器...
3.12 具有交互功能的对话框——AlertDialog窗口 3.13 置换文字颜色的机关——Button与TextView的交互 3.14 控制不同的文字字体——Typeface对象使用 3.15 如iPhone拖动相片特效——Gallery画廊 3.16 自制计算器——...
3.12 具有交互功能的对话框——AlertDialog窗口 3.13 置换文字颜色的机关——Button与TextView的交互-p60 3.14 控制不同的文字字体——Typeface对象使用 3.15 如iPhone拖动相片特效——Gallery画廊 3.16 自制计算器...
3.12 具有交互功能的对话框——AlertDialog窗口 3.13 置换文字颜色的机关——Button与TextView的交互 3.14 控制不同的文字字体——Typeface对象使用 3.15 如iPhone拖动相片特效——Gallery画廊 3.16 自制计算器——...